A Pill (tablet) Shaver for Medication Dose Adjustment
When a person I know had surgery to remove their thyroid, it meant they had to go on a dose of a synthetic thyroid hormone replacement. As I understand it, the dose is usually based on the person's body weight. Well, the "body weight" rule did not work here, and to make a long story short, this person needed "67 micrograms" of the synthetic hormone - not 65 or 69, but 67! Now when you find out that there are no doses available in "67" - you are somewhat in trouble! In fact, the closest dose on the market is either 50 or 75 micrograms! What to do?
Well, an ordinary person could take a larger dose tablet - say 137 micrograms, divide the tablet in half and take that. Half a 137 Microgram tablet is 68.5. Fine. Close enough. Right? Wrong!
68.5 is still too much! And to make matters worse, a 137 microgram tablet never divides evenly when you try to cut it in half, and one half might be 75 while the other was 62! No, this person needed 67, and 67 every dose!
I say again! What to do?
Need a "shaver"...
Well, after months of struggling with dividing 137 microgram tablet, I purchased a milligram scale, and began weighing the pill fragments so I could choose those fragments which most closely measured the weight for a 67 microgram dose. How, you might ask, do you measure MICROGRAMS on a MILLIGRAM scale? Well, the "dose" is not the "weight" of the tablet. A tablet with a "dose" of 137 micrograms, might weigh 0.125 grams. 1/2 of 0.125 grams would be 0.063 grams and THAT can be measured by a milligram scale.
So to get 67 micrograms, I would ratio the weight of a full-dose tablet - 137 micrograms, to determine the weight of a tablet which would be 67 micrograms. This is an easy ratio, and the result is 0.061 grams. [0.125/137 closely equal to 0.061/67]. So I would take one of the half 137 microgram tablets, and with a penknife nail file, file down the half tablet till it weighed 0.061 grams. This worked very well, but suffers from two problems: First, since the tablet would not divide perfectly evenly in the first place, 1/2 the tablet very often weighed LESS than 0.061 grams already, so it was useless. Second, after identifying those tablet halves which exceeded 0.061 grams, it took quite a bit of trial-and-error work to shave each tablet half down to the required weight. Shave some, weigh, shave some more, weigh. Repeat till the tablet weighed 0.061 grams and hope it did not weigh less!
And so, I searched the INTERNET for a device to do this - "shave" a tablet. Found none. The only devices on the market were "cutters" - not "shavers". I had established, a "cutter" does not cut the tablet precisely in half. One side of the divided tablet will ALWAYS have more than the other. Most people would not be able to detect the difference, but in this case just micrograms of dose difference was discernible!
So you can get a feel for what is at hand, here is an image of just what I am needing to do. On the left, is a full tablet - in this case a 75 microgram (dose, not weight) Synthroid tablet. On the right, is a tablet that has been "shaved" to 67 micrograms (again, dose, not weight):

Here is a shot of an intermediate step from the manual filing and weighing process. The pill, which started out weighed 0.132 grams, now weighs 0.125 grams - meaning the pill has been reduced from a 75 microgram dose to 71 micrograms. How much more to shave till I get to the desired dose? Hard to say! If I manually shave some more, I risk reducing the dose to less than the desired 67 micrograms:

Abandoning the idea of "crushing" the tablets to a powder because that means weighing out a measure of powder to try to get to the right dose, and then having the recipient consume the resulting completely powdered medication, I sought another alternative. I desired some way to "control" the shaving process so I would not have to repeatedly measure after a short session of shaving.
Design emerges...
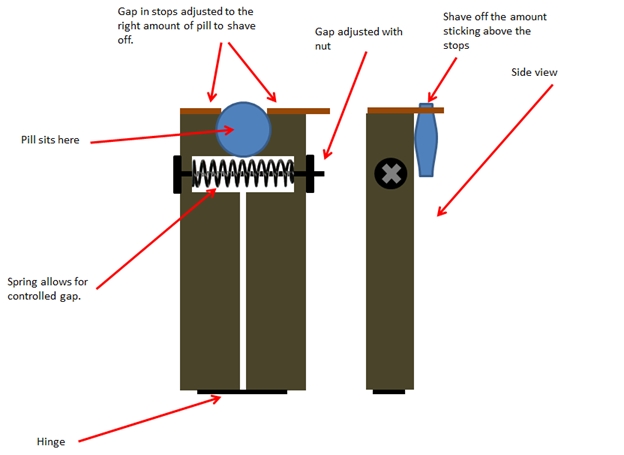
So I set out in my mind's-eye to envision a "pill shaver". This is what I envisioned:

Comparing my conceptual "design", above, with what I was able to build in my shop, here is the result:

Here is another view:

The design features visible in the photos are these: The two "posts" or "tines" (upper-right in the image immediately above) against which the tablet sits are just "exacto-knife" blades. They are thin, yet very, very strong. Thin enough sheets of tin, aluminum or brass were just too flimsy but exacto knife blades were thin yet very strong and stiff. They are also so hard they are practically impossible to drill, so they are glued in-place, and a thick piece of brass is bolted to the wood-frame and against the exacto-knife blades, to put pressure against the exacto blades so they would not "pop off" the end of the wood frame when holding a tablet against them. Note: If this is not clear from the illustrations, the "sharp edge" of the exacto blades is NOT used. Instead, it is the back end, the "tines" of the blade which form the strong edges against which the tablet is positioned. The "sharp edge" of the blade simply becomes the "extension" to hold the blade against the wood block. The sharp edge of the blade is not needed, indeed, it is covered by the brass clips which help hold the blade firmly in-place.]
Then, there is a thin brass plate which creates a "table" or platform to hold the tablet, yet still allow the wood-frame to be adjusted in width - narrowing or widening the gap between the exacto-knife blades.
One can see the hinge in the lower left of the 2nd photo (above), and the adjustment screw to adjust the gap. Not visible is the tension spring coaxial with the adjustment screw which keeps outward pressure on the two sides of the wooden frame, keeping the gap between the exacto-knife blades.
Turns out this design works really well! I am able to produce 14 shaved tablets in about 10 minutes. That's two weeks worth of properly-dosed tablets.
Automation desired...
After several months of preparing tablets in this way, I began to wish I had a way to further automate or at least semi-automate the production. Specifically, this design requires me to carefully hold the penknife against the tablet as it shaves, and keep it level and against the tablet till the penknife-file meets the exacto blades, and the "shaving" stops. This is tedious work, so I started working on a way to mechanize the motion.
Here is the result of my engineering modification:

I needed a way to "hold" the penknife parallel to the exacto-knife tines, yet be able to move the file edge back and forth, and be able to move the file against the edge of the pill as I shaved away at the pill. This means I needed an "X-Y" translation table.
Now, rather than buy a commercial, and expensive, X-Y translation table, I sought a way to build one cheaply. I had plenty of old computer parts around, and I knew an old "CD-ROM" drive used a very well designed mechanism to move and locate the CD's laser head to the proper spot on a CD or DVD, so I proceeded to disassemble a couple of old CD-ROMS to extract that mechanism. What I found was ideal! All I needed to do was to take two of the mechanisms, mount one at right-angles to the other, and voilà!, I'd have my X-Y translation mechanism.
Now here is a representative sample of the CD-ROM mechanism removed from the CD-ROM drive:

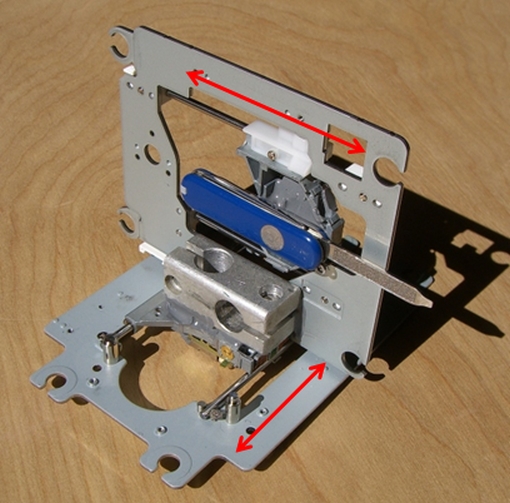
I didn't use the one on the left, above, as the metal plate was not as strong or rigid as the other one. But the one on the right was very substantial for this job, so I obtained a second one like it. Here is a shot of the two I used, epoxied at right-angles and to which I epoxied the penknife:

Examining this image, above, without elaboration, I hope you can see how simple this was. One CD-ROM translation table was used as the "base", while the other was epoxied to the slider on it. Thus, the penknife blade can translate in the "X" direction by the vertical slider, and in the "Y" direction via the horizontal slider. The red arrows in the graphic indicate the restricted motions in the X and Y axes.
All that remained to do was to mount the X-Y mechanism to the tablet-shaver I built earlier! So here is one more view, another perspective, so you can see the final results.

In this view it does not take much imagination to see that the original device - on which the pill sits - is now mounted to a base. The same base holds the X-Y frame on which the penknife is held. The penknife's motion is thus restricted to move in a constrained motion across the face of a tablet, while at the same time, as the tablet is shaved, the penknife file blade can continually move closer and closer to the exacto-knife blades by means of the other axis of motion - and stop the shaving upon contact with the exacto-knife blades! I also mounted a small plastic "dish" to capture the shavings from a tablet so as not to have the shavings falling all over the base.
Should it be necessary, the dose of a shaved tablet can be adjusted by turning the provided nut, on the side of the wood frame of the original device. As you can see in this next photo, I've already marked the positions for 67 to 68.5 micrograms, for a tablet which started out at 75 micrograms. (See red arrow).

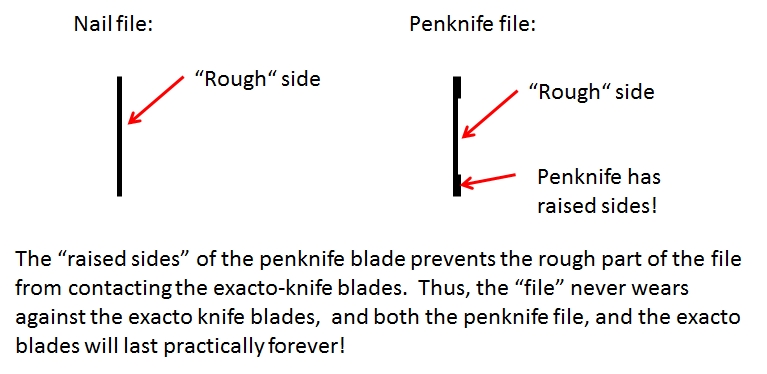
Now there is a very specific reason I chose the nail-file on a penknife, rather than an ordinary nail-file! Look at my illustration here and see why:

September, 2013 UPDATE! Pill Shaver now motorized!
After several months of operating the pill shaver, I became comfortable that the device was reproducing shaved tablets of equal mass (dose). Thus, the "production" of any number of shaved tablets became rather "routine", yet entirely manual. That led me to the following engineering change: Motorizing the cutting axis!
I made a quick estimate of the shaving action, timing the cycle of the cutting blade. I found with a "cycle" of about 2 strokes per second, about a 150 RPM motor would would adequately reproduce the motion. Online, I found a 133 RPM motor, small enough to "fit" the space I had available, so I acquired it. So as not to bore you with manufacturing details, here is the result:

The motor is simply mounted to an aluminum "L" bracket cut from the case of an old PC power supply. The reciprocating "arm" attached to the motor's drive shaft is just a control arm from an RC (radio control) component. Similarly, you see a piece of an RC servo control arm screwed to the stage which drives the cutting axis. Finally, the stage arm, and the motor shaft arm are connected with a 1/16" threaded rod, and clevis, again, taken from the RC world. A pushbutton switch completes the circuit while at the same time allows me to activate the drive motor, and feed pressure of the cutting blade against the pill. (In a later design change, I may simply attach a spring to the assembly to automatically provide that pressure! In that case I will move the pushbutton switch to the base. Then the device will become pretty much fully automated, with the exception that I must still hold the pill being shaved at its position against the exacto knife blades.)
For grins, here is an 8 second video of the motor in operation:
Bill Welker,
May, 2013
Last updated 4 April, 2021
